
Appearance
Easyplay 2 Pro User Manual
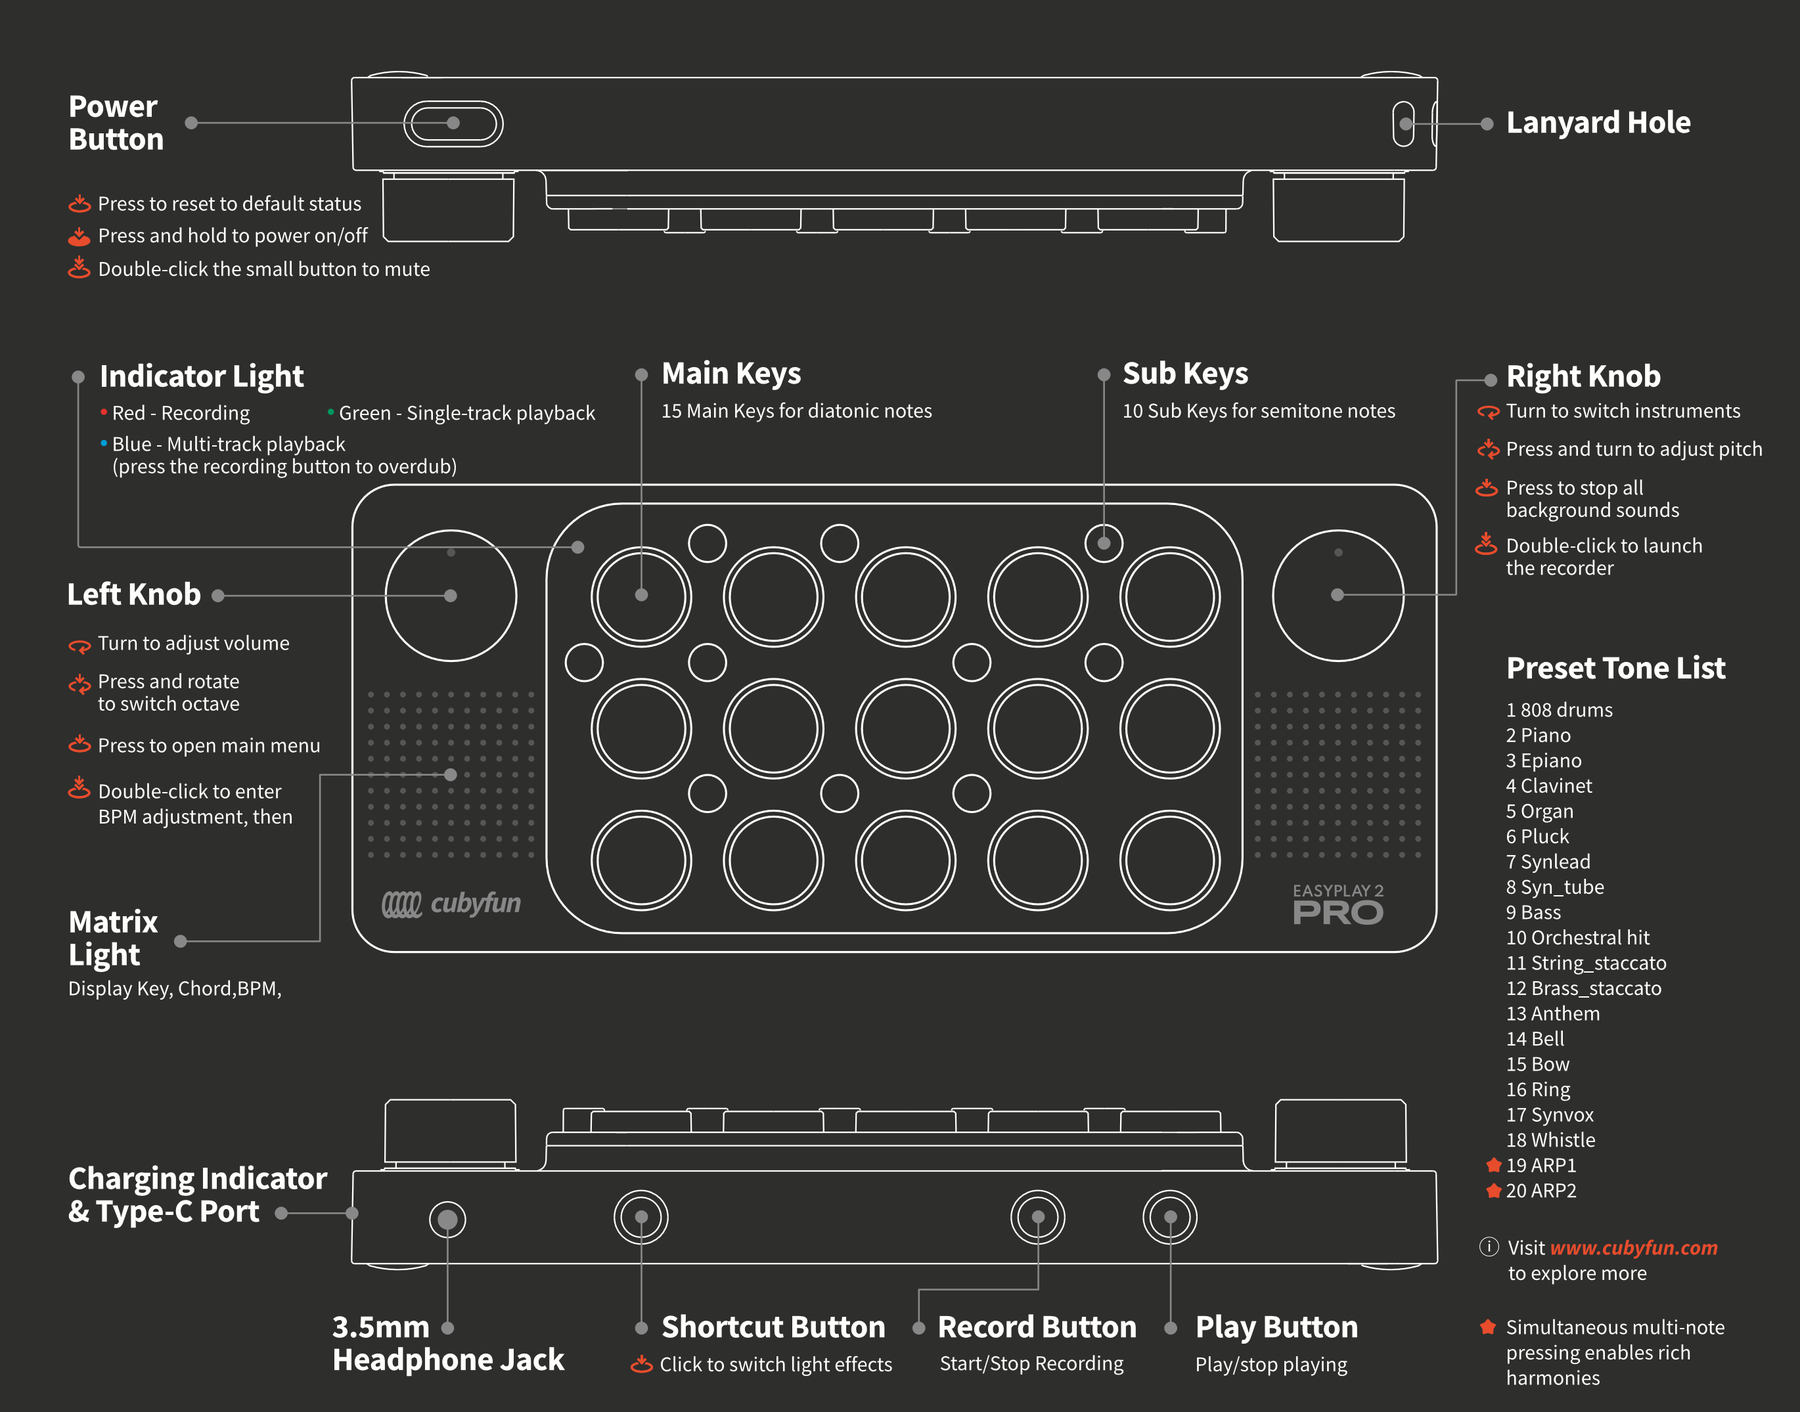
1. Device Overview
| Part | Function |
|---|---|
| Power Button | Press to reset to the default status. Press and hold to power on/off. Double-click the small button to mute. |
| Indicator Light | Red: recording. Green: single-track playback. Blue: multi-track playback (press the Recording button to overdub). |
| Left Knob | Turn to adjust the volume. Press and rotate to switch the octave. Press to open the main menu. Double-click to enter the BPM adjustment. |
| Matrix Light | Displays the key, chord, and BPM. |
| Main Keys | 15 Main Keys for diatonic notes. |
| Sub Keys | 10 Sub Keys for semitone notes. |
| Right Knob | Turn to switch instruments. Press and turn to adjust the pitch. Press to stop all background sounds. Double-click to launch the recorder. |
| Charging Indicator & Type-C Port | Indicates the charging status. Charge the device through the USB Type-C port. |
| 3.5mm Headphone Jack | Connects headphones or external speakers. |
| Shortcut Button | Click to switch the light effects. |
| Record Button | Start/stop recording. |
| Play Button | Play/stop playing. |
| Lanyard Hole | Attaches a lanyard. |
2. Main Menu
Press the Left Knob once from any operating state to open the main menu. Turn the Left Knob to switch between the eight functions, and press the Left Knob to enter the selected mode.
| No. | Function | Description |
|---|---|---|
| 1 | Free Play | Play freely or use chords to enjoy playing your beats. |
| 2 | Chord Pad | Play chords with one-touch controls, includes different rhythmic patterns. |
| 3 | Ambient Space | Choose from 15 types of white noise, or randomly select sounds to create your own ambient soundscape. |
| 4 | Finger Drum Gaming | Listen to a drum pattern and play it back from memory, aim for the highest score. |
| 5 | Lights On/Off | Turn the device's lights on or off with a single touch. |
| 6 | AI Lo-fi | Enjoy Lo-fi music as a relaxing backdrop while you work, study, or unwind. |
| 7 | Lighting Effects | Switch between multiple lights to customize the look of your device. |
| 8 | Loop Recording | Record and layer musical parts to create single-track or multi-track loops, then play them back with one-touch controls. |
3. Free Play (Default Startup)
The device starts up in Basic Playing Mode by default. You can also enter this mode by pressing the first mode key in the main menu.
- Playing area: The 25-key keyboard spans two full octaves.
- Left Knob: Rotate the Left Knob to adjust the overall volume. Press and hold the knob while rotating to change the octave range.
- Right Knob: Rotate the Right Knob to switch between built-in instrument sounds. Press and hold the knob while rotating to change the pitch in semitones.
4. Chord Pad
From the main menu, click the second button to enter.
Main Keys
- Row 1st & 2nd: Play diatonic chords from scale degrees 1-7, along with three additional preset chords.
- Row 3rd - Key 1st: Press and hold to switch between major and minor chords.
- Row 3rd - Key 2nd-4th: Switch between different rhythm patterns.
- Row 3rd - Key 5th: Stop the current chord playback.
Sub Keys
- Row 1st & 2nd: Correspond to chord extensions, with each key representing a different root note.
- Row 3rd: Select from three musical styles. The rhythm pattern and harmonic quality of the keyboard accompaniment adjust automatically to match the selected style.
Double-click the Left Knob to adjust the BPM, which affects the chord's playback tempo. This mode can also be recorded.
5. Ambient Space (White Noise)
From the main menu, press the third key to enter White Noise mode. Press a key to play its corresponding white noise sound, and mix up to three sounds at once.
- Random Selection: Press the Right Knob to randomly select three white noise samples.
- Stop Playback:
- Press a key to stop its sound.
- Outside White Noise mode, click the Right Knob.
- Background Playback: When you are not focused on manually playing, playback continues in the background for up to 30 minutes.
Playback will turn off when recording starts.
6. Finger Drum Gaming
From the main menu, press the fourth key to enter the game. A three-second countdown begins before the game starts.
- Level Pattern: After the countdown, the device plays the melody for the current level.
- Repeat Pattern: Reproduce the pattern from memory on the keyboard.
- Advance: Successfully reproducing the melody advances you to the next level.
The patterns will become more difficult gradually, try to challenge your highest record.
7. Lights On/Off
From the main menu, press the fifth key to turn the device's lights on or off with a single touch.
8. AI Lo-fi
From the main menu, press the sixth key to enter this mode. Soothing music starts generating. Play the keyboard along with the music to hear musical responses and see visual feedback on the keys and screen.
- Adjust volume: Turn the Left Knob and the Lo-fi music will change along with the user's playing.
- Switch music scenes: Turn the Right Knob. A loading animation appears on the screen, and the change takes effect in the next measure.
- Exit: Press the Left Knob to open the main menu and leave this mode. The music will stop.
- Switch between free performance and harmonious ensemble: Press the Right Knob briefly, and the screen will display a brief closing or unfolding animation.
9. Lighting Effects
From the main menu, press the seventh key to switch between multiple lights to customize the look of your device.
10. Loop Recording
The device can record and layer musical parts into loops.
- Record: Press the Record Button to begin recording; the red indicator flashes in time with the BPM. Press the Record Button again to stop recording.
- Playback: Press the Play Button to stop the current recording process and play back the recorded audio.
- Switch Recording Mode: Press and hold the Shortcut Button for 1 second, then press it again to switch between Single-Track and Multi-Track modes. The blue indicator flashes in Multi-Track mode, while the green indicator flashes in Single-Track mode.
When the indicator is red, recording is in progress. Press the Play button to stop recording and play back the recording.
Indicator light status
- Red: Recording.
- Green: Playback in single-track mode.
- Blue: Playback in multi-track mode; pressing the Record Button at this time adds another recording track.
11. Multi-track Work Flow
- First track: Short-press the Record Button to start recording, then play a basic rhythm or chord progression. When you're finished, press the Play Button once to end the recording and save it. The first track will then begin looping seamlessly.
- Multi-track superposition: While the current track is looping, short-press the Record Button again to start overdubbing. The indicator will flash and you'll hear the recorded track playing back. All the keys you play will be recorded on a new track. Repeat this process to add more tracks, up to a maximum of 8.
- Save overdub: Short-press the Record Button to stop recording.
- Delete a track: During playback, press and hold the Left and Right Knobs simultaneously to delete the most recently recorded track. The remaining tracks will continue playing. Repeat this process to delete tracks one by one until all tracks have been cleared.
- Delete the current track: While recording, press and hold the Left and Right Knobs simultaneously to erase the recording on the current track. The other tracks will continue playing. You can start playing and recording again immediately after clearing the track.
Recording controls: while recording, press the Record Button to stop recording. A single recording can contain up to 8 tracks.
While recording, press Play to end the current recording and start playback. Double-click the Right Knob to open the metronome. Double-click the Left Knob, then turn it to adjust the BPM.
12. Preset Tone List
| No. | Tone | No. | Tone |
|---|---|---|---|
| 1 | 808 drums | 11 | String_staccato |
| 2 | Piano | 12 | Brass_staccato |
| 3 | EPiano | 13 | Anthem |
| 4 | Clavinet | 14 | Bell |
| 5 | Organ | 15 | Bow |
| 6 | Pluck | 16 | Ring |
| 7 | SynLead | 17 | Synvox |
| 8 | Syn_tube | 18 | Whistle |
| 9 | Bass | 19 | ARP1 |
| 10 | Orchestral hit | 20 | ARP2 |
Simultaneous multi-note pressing enables rich harmonies.
13. Expansion
- Keyboard Mode: Rotate the Right Knob to select "Keyboard", then connect the keyboard to a mobile device or computer to apply a key layout preset.
- MIDI Mode: Rotate the Right Knob to select "MIDI", then connect the keyboard to a mobile device or computer to use it as a MIDI keyboard.
14. Device Update
Visit hub.cubyfun.com to explore more features and learn about device updates.
15. Battery & Charging
- Charging Indicator: The indicator stays red while charging and turns green when the battery is fully charged.
- Low Battery Warning: When the battery level falls below 20%, the indicator in the upper left corner flashes red slowly, and the LED matrix displays a low-battery icon.
- Charging Instructions: Charge the device using a standard 5V USB Type-C port. The indicator stays red while charging and turns green when the battery is fully charged.
16. Q&A
Q: Why is there no sound when I press the keys?
A: Check whether the Left Knob has been turned all the way down, reducing the master volume to zero.
Q: What can I do if I can't keep up with the rhythm while recording?
A: Double-click the Right Knob to turn on the built-in metronome. You can also double-click the Left Knob and rotate it to adjust the tempo (BPM) before recording.
Q: How do I reset the device to its default state?
A: Press the Power Button once to return the device to Basic Playing Mode.
17. Maintenance & Notes
This manual applies to the EASYPLAY 2 PRO series. For detailed specifications, please refer to the product label on the back of the packaging.
- Keep the product dry. Do not allow liquids to splash onto its surface.
- Do not disassemble the main unit yourself. Otherwise, cubyfun reserves the right to refuse free warranty service.
- We recommend charging the product at an ambient temperature of 5-35 °C.
- Use only a 5 V power adapter that complies with applicable laws and regulations to charge the device.
- Regularly inspect the cables, plug, casing, and other parts of the power adapter or battery charger for damage. If any damage is found, stop using the adapter or charger until it has been properly repaired.
- The power adapter is not a toy. Keep it out of children's reach. Do not use a damaged power adapter until it has been properly repaired.
This product uses the ESP32-WROVER-E module. CMIIT ID: 2020DP1674.
18. FCC Warning
This device complies with Part 15 of the FCC Rules. Operation is subject to the following two conditions:
- This device may not cause harmful interference.
- This device must accept any interference received, including interference that may cause undesired operation.
Changes or modifications not expressly approved by the party responsible for compliance could void the user's authority to operate the equipment.
Class B Digital Device
This device complies with the Class B digital device limits under Part 15 of the FCC Rules.
These limits are intended to provide reasonable protection against harmful interference in a residential installation.
If interference to radio or television reception occurs, try one or more of these measures:
- Reorient or relocate the receiving antenna.
- Increase the distance between the equipment and receiver.
- Connect the equipment to an outlet on a different circuit from the receiver.
- Ask the dealer or an experienced radio/TV technician for help.
The device has been evaluated to meet general RF exposure requirements. The device can be used in portable exposure conditions without restriction.